Continue the Pursuit Korean Folk Town Quest Maplestory
Progression Guide
For info on all the content in MapleStory, check out: https://www.grandislibrary.com/contents/level-content-guide
Quick Jumps:
- Introduction
- Job Advancements
- SP + AP Distribution
- Inner Ability
- Pocket Slot
- Gold Emblem + 4th Job
- Intense Power Crystal
- Hyper Skills + Hyper Stats
- Lv. 140 and Beyond
- 5th Job Advancement & Arcane River
- V Matrix + Nodestones
- Legion System
- Reward Points + Maple Rewards Shop
- Auction House in Regular Servers
- Important Content
- Important Questlines to Complete
- Equipment Content
- Spell Tracing
- Star Forcing
- Bonus Stats
- Transfer Hammer
- Epic Gear and so on
- Bosses
- Daily and Weekly Quests
- Training Maps
- Theme Dungeons
- Quests
- Lightbulb Quests
Introduction:
Some brief advice before starting, do not worry much about dailies and bosses until you've reached Lv. 200 and have obtained your 5th Job Advancement. Focus mostly on training and filling up your equipment slots. When you have time, complete some pre-quests for important content. Some bosses you could try and fight pre-200 are Normal Zakum, Normal Hilla, Easy Magnus, Root Abyss, Easy/Normal Horntail, Normal Ranmaru, and Ursus
Additionally, all classes are going to be weak early on, especially if this is your first character. As you get closer to Lv. 200, monsters will hit you hard and they will be harder to defeat. Past Lv. 200, it does get easier but you'll need to fill up your equipment slots and start upgrading your equipment. Lastly, you probably won't get to the level where your class is as strong as the DPM charts suggest plus, DPM charts do not translate to the actual DPM while playing the game. Choose a class that you enjoy or seems enticing and go from there
Good luck on your Maple journey!!
Job Advancements:
Most classes in the game have Job Advancements at Lv. 10, 30, 60, 100, and 200. These are referred to as your 1st, 2nd, 3rd, 4th, and 5th Job Advancements. During your Job Advancement, you will gain new skills to use
To start your Job Advancement, open your Maple Guide, "U" by default, and you will see a button that says "Job Advancement Quest"
[Note]: Dual Blades have two additional Job Advancements at Lv. 20 and Lv. 45. They are a continuation of your 1st Job and 2nd Job Advancements and you will gain new skills at these levels
[Note]: Beast Tamers do not have Job Advancements and instead only unlock new skills by reaching a certain level and allocating enough SP into an animal tree. A common build path is Bear/Hawk/Cat. For mobbing or Legion, you can use Bear/Leopard/Cat instead
[Note]: Zero does not have Job Advancements and instead only unlock new skills by reaching certain levels
SP and AP Distribution:
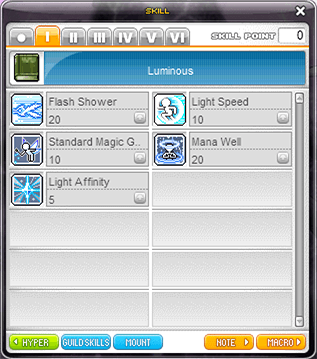
All newly created characters (except Beast Tamer) can max all of their 1st - 4th Job skills
A tip for allocating SP is to first put 1 point in everything and then start maxing skills that require the least SP to reach Master Level. Next, start maxing passives by prioritizing the least SP and ones that provide useful stats like %Final Damage, %Damage, %Max HP, or %Damage Reduction. Next, move onto buffs and then lastly attacks
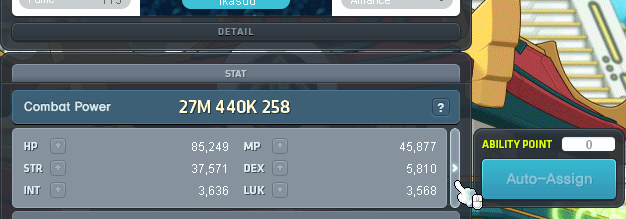
For AP, you gain 5 AP every time you level up and most classes gain 5 AP for each Job Advancement from 1st to 4th. You do not need to worry about how to allocate your AP, instead just use Auto Assign for all your AP
[Note]: If you are playing Xenon, it is best to distribute your AP evenly between all 3 stats. You can easily do so by using the Auto Assign from 1st Job to 4th Job, the game will let you know when you've reached the requirement for the Multilateral skills. Past Lv. 200, you continue to evenly distribute your AP by referring to your current stats
[Note]: If you are creating an Explorer Pirate, you will have the choice between Auto Assigning to STR or DEX, choose STR only if you are creating a Buccaneer and DEX only if you are creating a Corsair
[Note]: If you are playing Beast Tamer, you will continue to gain SP up until Lv. 250. An ideal build path is Bear/Hawk/Cat. For mobbing or Legion, you can use Bear/Leopard instead and allocate remaining points either into Hawk or Cat
Inner Ability:

To unlock your Inner Ability, you need to be Lv. 50. You will find a quest in your Lightbulb tab on the left-hand side called "The Eye Opener"
Inner Abilities are special bonuses that add extra stats to your character. They work similarly to potentials and can be reset using 
 Honor EXP. Just like Potentials, there are different tiers, Rare, Epic, Unique, and Legendary. You can tier up by using Honor EXP to reset your Inner Ability but watch out, resetting can also drop your tier if you are above Epic. If you are starting out, you do not need to worry too much about it just yet. If you do have an excess of Honor EXP, you can start by resetting to reach Unique or Legendary Ability
Link Skills:
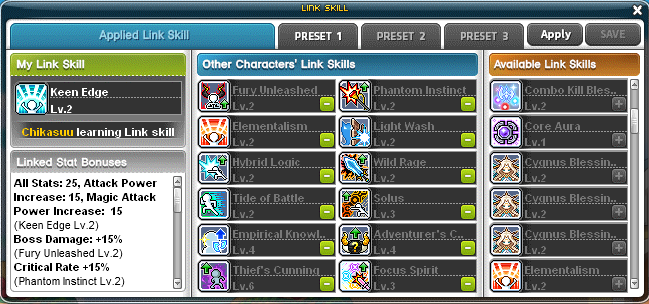
Link Skills are unique to each class and can be given to your other characters on the same world. Link Skills mostly come as passives but there are a few Active Link Skills too Once a character reaches Level 70, they can share their Link Skill with another character. When you Share your Link Skill, both characters will gain the effect of the Link Skill. Sometimes Link Skills may have different effects for the character with the linked version. Link Skills grow stronger at Level 120 (Skill Level 2) and most grow stronger again at Level 210 (Skill Level 3). Some Link Skills can stack increasing the strength of the Link Skill by linking the same Link Skill multiple times from different characters of the same class group
[Note]: If you do not see your Link Skill in the Link Manager, you may have to accept a quest in the Lightbulb tab on the left-hand side of the screen. If you still do not see it, try relogging For more info on Link Skills, check out: https://www.grandislibrary.com/contents/link-skills
Pocket Slot:
Pocket Slot is an additional equipment slot you can unlock to equip Pocket Items. To unlock the Pocket Slot, you will first need to reach Lv. 30 Charm in your Traits Stat
Traits are special stats that provide small bonuses to your character. To learn more about Traits, check out: https://maplestory.fandom.com/wiki/Traits
You can increase your Charm by using 
 Cologne,
  Trait Boost Potions found in Event Shops, increasing your Fame level, wearing special equipment or Cash Items, or changing your hair
Once you've reached Lv. 30 Charm you will receive a quest in your Star Event Tab on the left-hand side from Big Headward in Henesys Hair Salon. You will be asked to bring a  Rose Clipping that can be found by harvesting herbs or from the Auction House
Once unlocked, you can buy a regular Pocket Item from Nave in Henesys Market. There are also other special Pocket Items you can obtain but the most commonly used ones are dropped by bosses such as,  Stone of Eternal Life from Hilla,
  Pink Holy Cup from Pink Bean, or
  Cursed Spellbooks from Will
Gold Emblem + 4th Job
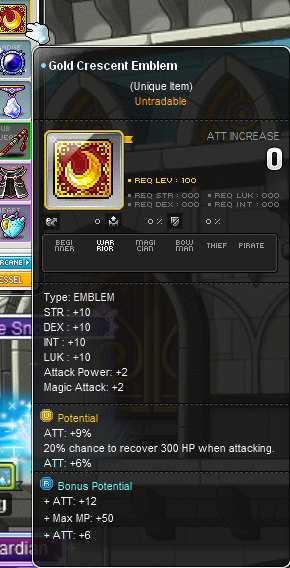
At Lv. 100, most classes will get their Gold Emblem for free by accepting a quest in your Lightbulb tab on the left-hand side of the screen. Emblems are very important and easy to obtain equipment that should be obtained right away. Emblems are special like Weapons and Secondary Weapons in which they can obtain %Ignore DEF, and %Attack lines as potentials which are very important stats to have. However, Emblems cannot obtain %Boss Damage
Upon reaching 4th Job, you should start upgrading your equipment and Star Force them to 10 - 5 stars. It does not matter if the gear will be replaced, this will help you to fight monsters at an optimal pace
[Note]: For Kaiser and Angelic Buster can buy their 
 Emblem from Harpoon or Mayala
[Note]: For Xenon can buy their  Emblem/Power Source from Edwin or Silbaron
 Intense Power Crystals:
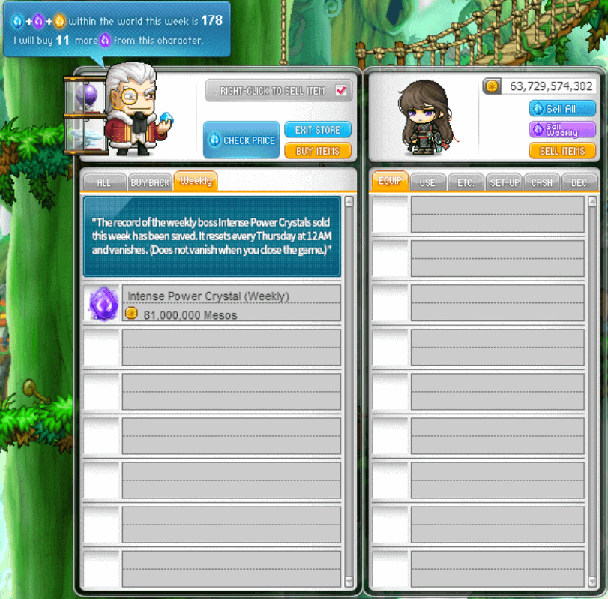
Most bosses (excluding Gollux) drop [Intense Power Crystals] that can be sold for Mesos. The price of the Intense Power Crystal will vary based on how many players are in your party, the difficulty of the boss, and if the boss is daily or weekly
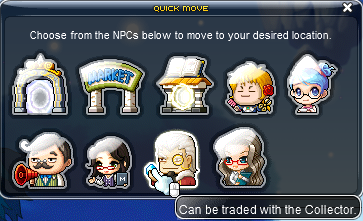
To sell your Intense Power Crystals, access the Collector found by pressing the "Quick Move" button located below the minimap from any town. You can also access the Collector through the Free Market, also accessible from "Quick Move". The Collector will only accept 60 Intense Power Crystals a week and resets on Thursdays 12am UTC
Hyper Skills + Hyper Stats
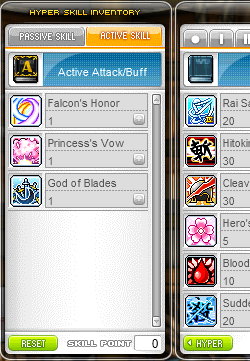

At Lv. 140 you will unlock access to Hyper Skills and Hyper Stats. Hyper Skills have a passive and active category. Active Skills are unlocked at Lv. 140, 160, and 190. Passive Hyper Skills provide benefits to some of your 1st - 4th job skills. You gain a 1 SP for your Passive Hyper Skills at Lv. 140, 150, 165, 180 and 190 (total of 5 SP)
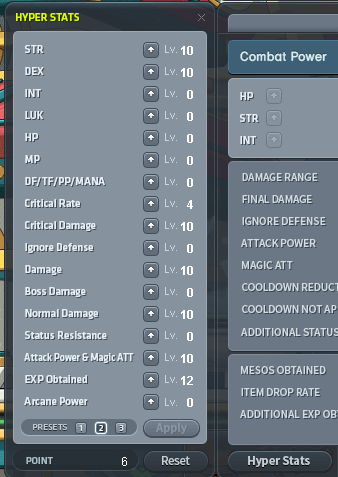
Hyper Stats are special stats such as %Crit Rate, %Crit Damage, %Ignore DEF, %Damage, and %Boss Damage that you can allocate points into to level up and gain stats for. As you level up a Hyper Stat, it will cost more to upgrade. You gain Hyper Stat Points every level and the amount you gain every level increase every 10 levels
Hyper Stats are very dependent on what you currently need at the moment rather than what is optimal for your class. Are you optimizing for bossing or mobbing? Do you need more damage? Crit Rate? To optimize your Hyper Stats for your current needs, I recommend you use the MapleStory Calculator created by MasteringGaming
For more info on Hyper Stats, check out: https://strategywiki.org/wiki/MapleStory/Hyper_Stats
Level 140 and Beyond:
Upon reaching Lv. 140, take some time to fill up every equipment slot and Spell Trace everything if you are on Regular Servers. Be sure to Star Force everything as much as you can. A bare minimum of 5 Stars on everything but the best would be to have at least 10 Stars. As well, reveal all the potentials on your equipment and try to use cubes to reroll for some %Main Stat or Epic Potential
If you need help filling up your equipment slots, check out the Equipment Content section of this guide!
You can also check out https://www.grandislibrary.com/contents/upgrading-enhancing-equipment for info on upgrading and enhancing your equipment
Going forward, you do not need to worry much about dailies or bosses for now until you've reached Lv. 200. You can however try and fight some bosses in the < 2k Main Stat section of the Bosses part of this guide for Mesos, equipment, and Occult Cubes. Your main priority right now is leveling up and working towards filling up each equipment slot with Epic Potential gear
If you are struggling with Mesos, be sure to complete ![]() Maple Tour every day as the main reward is Mesos
Maple Tour every day as the main reward is Mesos
5th Job Advancement & Arcane River:
Mandatory Requirements to accept 5th Job Quest:
- 100 Star Force minimum total
- 10 Star Force on Primary Weapon
Requirements to Job Advance: 

- After talking to the Memory Keeper and Temple Keeper, you'll receive a quest called "5th Job: Blessing of the Goddess". Once you've talked to all the Goddesses and completed their challenge, you can job advanced to 5th Job
- Visit Henesys: Bowman Instructional School and press up on the Horizon Portal
- Talk to the "Goddess of Maple World" to complete the quest
- Visit Dark World Tree: Deserted Camp and press up on the Horizon Portal
- After talking to the "Goddess of Tynerum", defeat all enemies and a series of maps after being teleport
- Visit Pantheon: Grand Temple Interior and press up on the Horizon Portal
- Talk to the "Goddess of Grandis" twice and defeat a weak version of Magnus after being teleported
- Each goddess will give you an
 Arcane Stone which you can charge up by fighting monsters. Once the stone has been charged, you can use it again to gain some EXP
- You do not need to charge the stones up to Job Advance
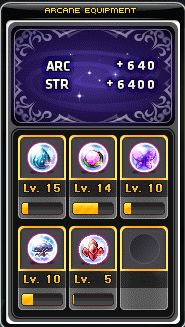
After Advancement, obtaining an Arcane Symbol: To deal damage to monsters in the Arcane River - the main region past Level 200, Arcane Power is required similar to Star Force which you gain from equipping  Arcane Symbols
- To obtain your first Arcane Symbol, you must complete the quest "A Greater Power" located in your Lightbulb icon. This quest is intentionally difficult as you have no Arcane Power yet
- [Note]: The symbol you obtain is not a real Arcane Symbol yet until you complete the Vanishing Journey storyline. In the meantime, you must complete the story with the limited Arcane Power you have
- [Tip] If you are struggling to defeat the monsters, there is a Hyper Stat for Arcane Power, allocate some points temporarily until you get enough Arcane Power
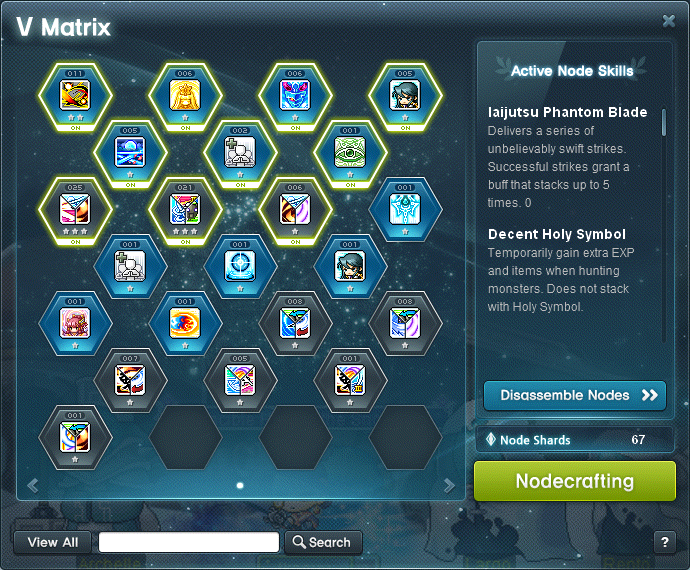
5th Job V Matrix + Nodestones:

In 5th Job, you do not gain skills regularly like your previous Job Advancements. Instead, you have "Nodes" which contains a 5th Job Skill. You can equip these Nodes into your V Matrix to gain access to that skill. To gain Nodes, you need to open  Nodestones that are obtained from monsters in the Arcane River, Vanishing Journey Weekly Quest, Nodecrafting, and Event Shops
To view your V Matrix, open up your Skill UI, "K" by default, and click to the "V" tab and press the "V Matrix" button at the top
You will notice you have empty slots and locked slots. You gain additional slots as your character levels up which will allow you to equip more Nodes and in turn more 5th Job Skills. Additionally, you can pay Mesos to unlock slots early. To equip a Node, double-click or drag them into an empty slot
All classes have their Main 5th Job Skills that are exclusive to that class. There are also 5th Job Skills exclusive to a certain Class Group like Explorers or Cygnus Knights. Lastly, there are Common 5th Job skills that are available to all classes
You do not gain SP normally like your previous Job Advancements to level up your skills. Instead, you will need to enhance your Nodes to increase a skill's level. Each Node will have a Rank and EXP associated with it. To enhance a Node, you will need copies of the same Node to gain enough EXP to rank up. Upgrading a Node's Rank will increase the associated skill's level
There are 3 types of Nodes:
 Skill Nodes: These contain the main 5th Job Skills themselves
- A Skill Node has a max Rank of 25 or Master Level of is 25 (30 with Matrix Points)
- Only one copy of a Skill Node can be equipped at once
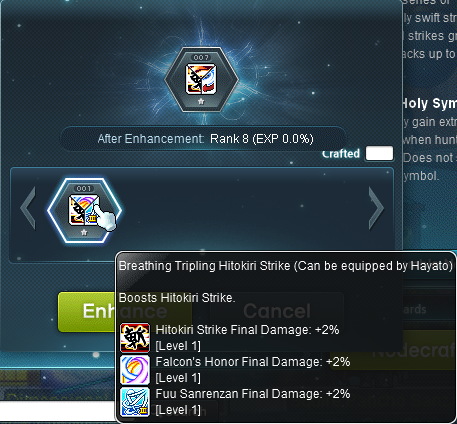
 Boost Nodes: These are passives that increase the %Final Damage of your 1st - 4th Job Skills. They also provide different bonuses based on the Skill Level of the node such as extra %Crit Rate or %Ignore DEF
- Each Boost Node will enhance 3 different Skills. When you hover over a boost node in your V Matrix, the Main Skill that is used for leveling up a Boost Node will be the skill at the top. You will need multiple Boost Nodes with the same Main Skill to upgrade a Boost Node
- Each Boost Node has a max Rank of 25 but each boosted skill can reach a Master Level of 50 (60 with Matrix Points) by equipping two Boost Nodes that boost the same skill
 Special Nodes: These nodes provide a special effect that trigger once you've fulfilled a specific requirement
- They cannot be leveled up and have a timed duration and will disappear
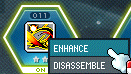
- It is best to disassemble these nodes for Node Shards that are used to craft new Nodes
Matrix Points
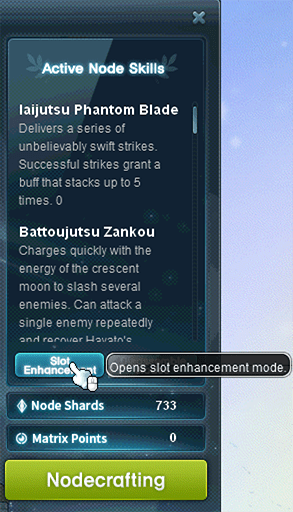
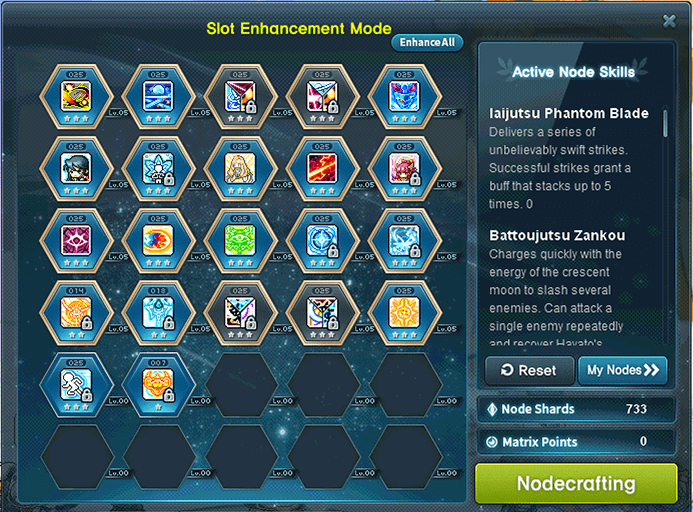
Each time your character levels up, you gain a Matrix Point. Matrix Points are used to raise a Node's Rank but they are tied to the Node Slots themselves instead of the Node. Each slot can allocate up to 5 additional Ranks for a Node. This means each Skill Node or Boost Node can reach a max Rank of 30. You can assign your Matrix Points in the V Matrix by pressing the "Slot Enhancement" button
Node Enhancing
To enhance your Nodes, right-click a Node you want to enhance. Using copies of the same Node you are trying to enhance, you consume the extra Nodes to the gain EXP required to level up a Node. As mentioned previously, to enhance Boost Nodes, you need Nodes with the same Main Skill. All Nodes have a max Rank of 25 meaning each Node provides 25 Skill Levels for a skill
To gain additional Nodes, you will need to open Nodestones which will give you a random Node for your class. You can obtain Nodestones from monster drops in the Arcane River, from the Weekly Quest in Vanishing Journey, Nodecrafting, and from Events
There are also special Nodestones called  [Experience Nodestone] which when opened provides an EXP Node that can be used on any Node as EXP. These Nodestones are only obtainable from Events
Node Disassembling
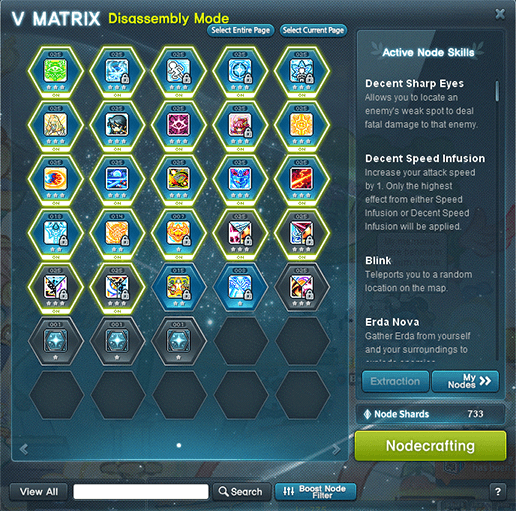
Nodes can be disassembled to gain Node Shards that are used to craft more Nodestones or a guaranteed Node. To disassemble Nodes, press on the "Disassemble Nodes" button beside the "Slot Enhancement" button
You can select multiple Nodes to disassemble at a time or right click to select to disassemble a single Node
Nodecrafting
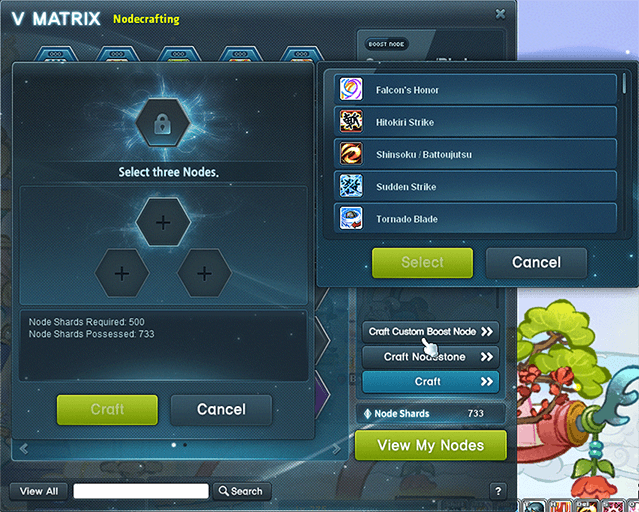
Specific Nodes can be crafted by pressing the "Nodecrafting" button. To craft Nodes, you will need Node Shards which are obtained from disassembling Nodes
In the Nodecrafting UI, select the Node you want to craft and then press the "Craft" button. Do not press the "Craft Nodestone" button as you will craft a Nodestone instead
[Note]: When crafting Boost Nodes, you can choose the Main Skill for that Node by selecting the desired skill in the Nodecrafting UI
Legion System
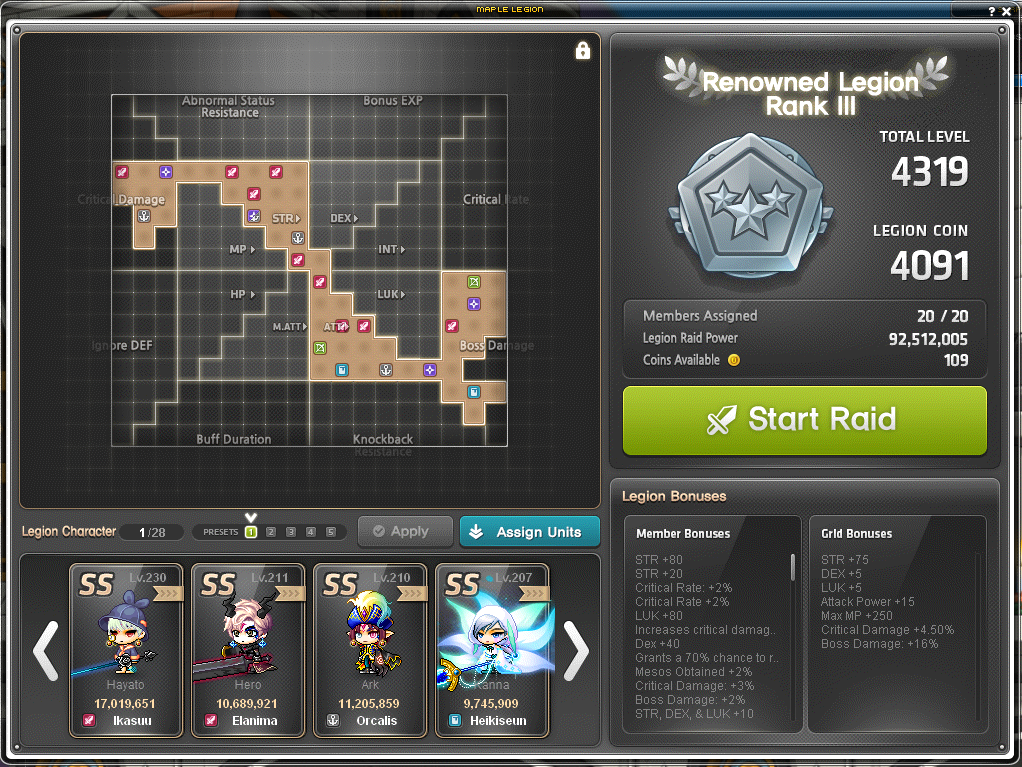
A system that is unlocked when you have either a total of 500 levels within your World from your characters or have reached Lv. 200 and completed the 5th Job Advancement. You can assign your characters onto a grid to provide bonuses to all your characters in your World
You will see there is a "Total Level", this is based on your 40 highest level characters. This is also referred to as your "Legion Level". The higher your Legion Level the more characters you can assign to your grid. To increase the amount of characters you can assign, you also need to give your  [Legion Coins] to Dame Appropriation. Legion Coins are gained passively based on your characters currently assigned to the grid
Legion Coins are also used to buy special items from Squire Pancho Sanza such as  [EXP Booster],
  [Drop Rate Booster],
  [Meso Rate Booster],
  [Epic Potential Scrolls],
  [Master Craftsman's Cube],
  [Bonus Potential Scrolls] and
  [Powerful Rebirth Flames]
Reward Points + Maple Rewards Shop:
 Reward Points are a special currency used in the Cash Shop at the Maple Rewards Shop or to apply a 30% discount to certain Cash Shop purchases. The discount, however, is very limited so Reward Points are usually only used to buy items from the Maple Rewards Shop
Reward Points expire at the end of the next month that the points were obtained. So if you obtained some Reward Points in August, the points would expire on September 30th
The Maple Rewards Shop contains a variety of Cash Shop items available for purchase with Reward Points. You can only buy a set amount of each item per month per account, and the items restock every month. Certain items are not available in Reboot Servers since you can already buy them with Mesos or are related to upgrading/scrolling
Some notable items in the shop are:
Some ways to obtain Reward Points are:
- Defeating bosses and completing a quest in the pink giftbox tab on the left-hand side of the screen
- The giftbox should have stars on it and a "C" with a ribbon
- The quests are automatically accepted each day, you just need to remember to hand it in or else it will not reset
- Monster Collection Explorations
- Playing MapleStory M, the mobile game
- Fairy Bros Daily Gift Reward
Auction House in Regular Servers:
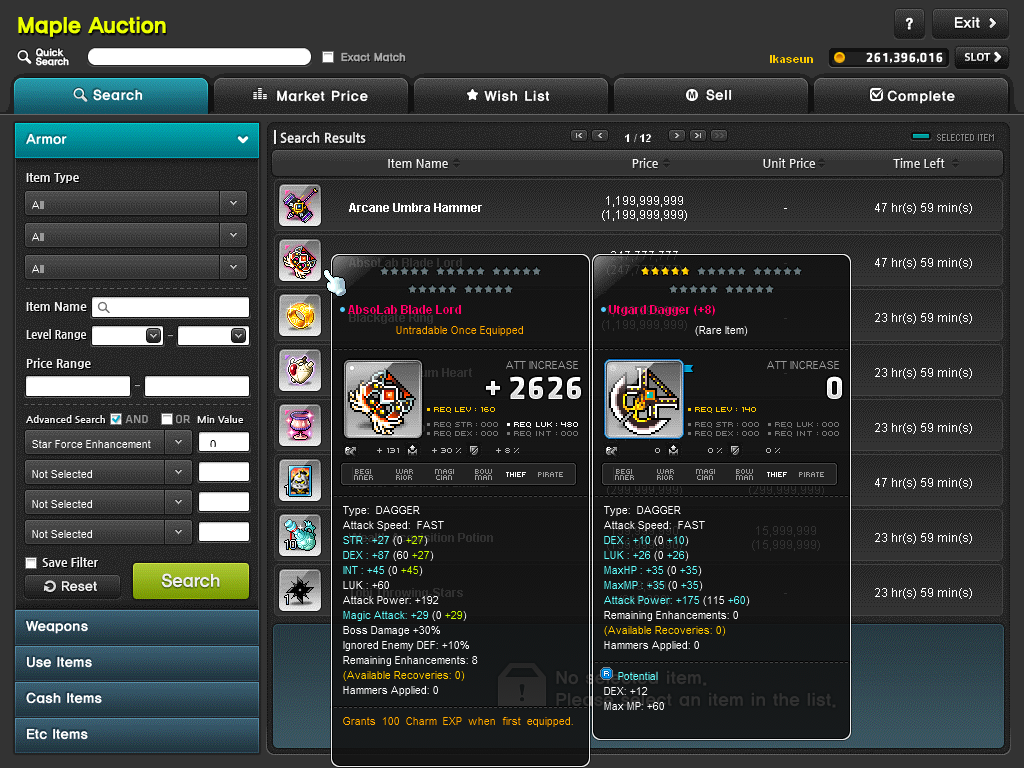
Auction House in Regular Servers allows you to buy and sell items to other Maplers. You can buy anything from equipment, potions, to cosmetic items like chairs and cash clothing. As well, you can also buy Wonderberry pets here that pick up items for you
Important Content:
Important Questlines to Complete:
Questlines here unlock access to bosses or reward worthwhile equipment
Equipment Content:
- Level beside items are when they can be obtained or equipped
- For a more in-depth guide to Gear check out: https://docs.google.com/presentation/d/1cvwscy79thl_jahbjQlw60KzIiEEYUFd7gBwqajACfY/preview#slide=id.p
- Can be applied to regular servers too
- For more info on equipment in the game check out: https://maplestory.fandom.com/wiki/Item
Lv. 10 - 120:
Lv. 120+:
Boss Armor:
- Considered a Boss Item for Flames/Bonus Stats
- Considered the main gear to strive because they are Boss Items
Boss Accessories:
Dawn Boss Accessories:
Pitched Boss Accessories:
Progression towards Midgame:
For info on upgrading and enhancing gear check out: https://www.grandislibrary.com/contents/upgrading-enhancing-equipment
 Spell Tracing in Regular Servers:
For regular servers, be sure to upgrade all your gear with at least 70% Spell Tracing so that you can start Star Forcing your gear as well. On average, 70% Spell Tracing provides an optimal amount of stats compared to just 100% Spell Tracing your equipment
In Reboot Servers, Spell Traces are useless and can be sold to NPCs for extra Mesos
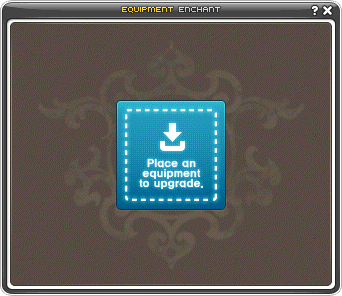
You can open the Equipment Enchant menu for Spell Tracing and Star Forcing by either pressing "O" by default or through your inventory by pressing the red button with a hammer
Some ways to obtain Spell Traces are:
- Monster drops
- Surprise Missions
- Inferno Wolf + Pollo/Frito Missions
-
 Crusader Coin shop
Spell Trace Fever:

Occasionally on Regular Servers, there are special events that take place where Spell Trace enhancements have a higher success rate. These are the best times to upgrade equipment you plan to invest a lot of time into. Unless you are planning to perfect a piece of equipment, you do not need to wait for this event to start Spell Tracing
50% Off Spell Tracing:
Occasionally on Regular Servers, during Sunny Sundays, there are events where Spell Tracing will cost half the amount. This is a good time to use Spell Traces on (Ark) Innocence Scrolls or Clean Slates but, Spell Trace Fever is much better still because of the increased rates. Also, using regular 10% Clean Slates and 50% Innocence Scrolls will probably be more cost-effective than using the Spell Tracing versions
Star Forcing:
Once you have consumed all upgrade slots, you may star force/enhance your gear. In Reboot, there are no upgrade slots, so you just star force/enhance instead. Star Forcing costs Mesos that grants increased stats on success
A recommended amount of stars you want for each piece of equipment is around 10 - 12 stars early on but optimally all gear at 12 stars
Occasionally there are events with shops that sell  [Star Enhancement Scrolls] which sets an equipment's Star Force to the said amount. There is normally one that enhances your gear to 15-stars that you can get from events if you do not have enough Mesos to Star Force. Past 15 stars, equipment start to see a clear difference from equipment with fewer stars
30% Star Force Discount:
Occasionally on Sunny Sundays, there is an event where Star Forcing prices are discounted by 30%. These are the best times to Star Force if you are trying to reach above 15 stars. If you are just Star Forcing regularly to 12 stars, you do not need to wait for this to happen
5/10/15 Star Force 100%:
Occasionally on Sunny Sundays, there is an event where enhancing to 5, 10, or 15 Star Force, the success rate is guaranteed. This is also a good time to try reaching to 15 stars but is not necessary to start Star Forcing your gear
1+1 Event:
Occasionally on Sunny Sundays, there is an event where for every Star Force enhancement below 10 Stars, you gain 2 stars. This is also a good time to try reaching to 15 stars since you essentially only need to keep trying from 12 Stars, but is not necessary to start Star Forcing your gear
Bonus Stats:
For now you do not need to worry too much about Bonus Stats and Rebirth Flames. If you do obtain a special rebirth flame, feel free to use it on anything or on regular servers, you can sell them (if tradeable)
Some nice stats to reroll into is your Main Stat, %All Stat, %Boss Damage or Attack/Magic Attack
Some reasons that make certain items better than others (or best-in-slot) include:
- Level Requirement of gear, higher the level, the better
- Level also affects the scaling of Bonus Stats
- Base Attack value & base stats
- Higher attack results in higher attack scaling on flames/bonus stats
- Amount of Star Force that can be obtained ( best being 25 stars)
- This is tied to the level requirement of the gear - higher level, more stars
- This is the most important factor
- Potential lines that can be obtained
- This is tied to the level requirement of the gear - higher level, better lines
- Ex. Higher level potentials provide more %Stat than lower level potentials
- Is a Boss Item / KMS Item
- These items can obtain higher tiers of Bonus Stats than non-KMS items
- Set bonus effect
Transfer Hammer:
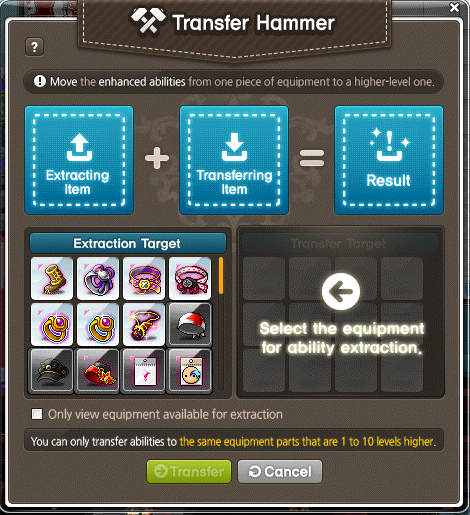
Transfer Hammer is a system that allows you to transfer Star Force, Potentials, Bonus Potentials, and Soul Weapon from one equipment to another (with restrictions). The following will not be transferred, Scrolled Stats and Bonus Stats. Additionally, you will lose one Star Force while transferring and any potentials above Epic will be dropped down to Epic Potential. You can only transfer equipment up to 10 levels apart of each other. For equipment below Lv. 119, you can transfer up to 20 levels apart
Some requirements for Transfer Hammering is that the piece of equipment must have at least 1 Star Force, cannot be Superior Gear (such as Tyrants) and must be the same equipment type (regardless of job group). Overalls can be counted towards both as a top or bottom and vice versa
In regular servers, any remaining upgrade slots will be filled by 100% Spell Traces for free. You can choose which stat you want the upgrades to be. I recommend that you already Upgrade/Spell Trace the Transferring Item first if you do not want the 100% Spell Trace stats

To begin Transfer Hammering, you can access the UI from your Inventory by pressing the blue hammer icon For more info on Transfer Hammer, check out: https://strategywiki.org/wiki/MapleStory/Transfer_Hammer
Epic Potential Gear and so on:
Early game you want to have all your gear at least 9% Main Stat and Epic Potential. You will also be wanting to be working towards Unique Potential gear. Your main focus for this would be to try and get your Weapon, Secondary Weapon, and Emblem to unique first as their potentials can provide special stats like %Attack/Magic Attack, %Ignore DEF and %Boss Damage unlike the rest of your gear. As a note, do not keep %Damage lines as they do not provide as much as a boost as the other potential lines do
Additionally, be sure all your equipment have 3 lines of potential instead of 2. Use  [Gold Potential Stamp] to unlock a 3rd line if needed
Do not be afraid to use expiring [Master Craftsman's Cubes] as it's better to use them than waste it. As well, take that risk of rerolling your "okay" potentials for "great" potentials as they are easily replaceable (unless you have that 36% main stat)
Some ways to obtain Epic Potential Scrolls are:
- [Reboot] Yu Garden shop
- [Regular] Auction House
- Event Shops
- Elite Bosses
- Pollo/Fritto Missions + Inferno Wolf
- Legion System
Some ways to obtain Gold Potential Stamps are:
- [Regular] Auction House
- Search for [Perfect Potential Stamp]
- Search for
- Event Shops
- Elite Bosses
- Pollo/Fritto Missions + Inferno Wolf
- Legion System
Some ways to obtain Master Craftsman's Cubes are:
- Crafting
- Harvesting from Mysterious Veins / Herbs
- Commerci Voyages
- Bosses
- Pollo/Frito Missions + Inferno Wolf
- Surprise Mission
[ < 2k Main Stat] Earlygame Bosses:
The amount of Main Stat listed is just a safe recommendation, your class may be able to defeat a boss with lower stat if you have the damage or the right mechanics
As well, it should be noted, a better, more general guide would be to consider which floor you can reach in Mu Lung Dojo although neither is perfectly accurate. The best way to check if you can defeat a boss is by trying, especially in Practice Mode when applicable
To view bosses by Dojo floors, check out: https://i.imgur.com/9u2Z6vq.png
-
 Normal Zakum: Source of good EXP early game
 -
 Ursus
Ursus - [Reboot Important]: In Reboot servers, the amount of Mesos rewarded is increased and is considered a main activity
- For more info on Ursus, check this out: https://strategywiki.org/wiki/MapleStory/Ursus
-
 Easy Papulatus
 -
 Easy Magnus
 - Source of Reward Points,
 [Soul Shard],
  [Occult Cube],
  [Elixir], [Crusader Coin], and [Intense Power Crystal]
 - Easy Mode and Above Rewards:
 [Superior Belt],
  [Superior Cape],
  [Crystal Ventus Badge],
  [Royal Black Metal Shoulder],
  [Kaiserion],
  [Lv. 110 Rebirth Flame],
  [Shadowdealer Coin]
- Source of
-
 Normal Hilla
 -
 OMNI-CLN
[ > 3k Main Stat] Earlygame Bosses:
-
 Easy/Normal Gollux:
 -
 Normal Root Abyss:
 -
 Easy/Normal/Chaos Horntail
 - Source of Reward Points, [Occult Cube], [Elixir],
 [(Chaos Only) Power Elixir], [Crusader Coin], and [Intense Power Crystal]
 - Easy Mode and Above Rewards:
 [Silver Blossom Ring],
  [Dea Sidus Earrings],
  [Horntail Necklace], [Elixir],
  [Lv. 120 Rebirth Flame]
 - Normal Mode and Above Rewards:
 [Wealth Aquisition Potion Recipe]
 - Chaos Mode Only Rewards:
 [Chaos Horntail Necklace], [Power Elixir] ,
  [Horntail Fountain]
- Source of
-
 Easy/Normal/Hard Von Leon
 - Source of Reward Points, [Soul Shard], [Occult Cube], [Elixir], [Crusader Coin], and [Intense Power Crystal]
- Easy/Normal Mode and Above Rewards: [Elixir], [Lv. 120 Rebirth Flame], [Soul Shard], [Occult Cube] ,
 [Von Leon Gear Currency] , [Intense Power Crystal]
 - Hard Mode and Above Rewards:

 [Lv. 130 Von Leon Gear],

 [Ifia Accessories],
  [Lion Ice Sculpture]
 - exchange for [Lv. 130 Von Leon Gear]
- Source of
-
 Normal/Hard Mori Ranmaru
 - Hard requires much more range than Normal (close to 10k Main Stat) however grants a lot of EXP when defeated
- Source of Reward Points, [Occult Cube], [Elixir], [(Hard Only) Power Elixir], [Crusader Coin], and [Intense Power Crystal]
- Normal Mode and Above Rewards:
 [Lv. 120 Gear] , [Lv. 120 Rebirth Flame], [(Reboot Only) Powerful Rebirth Flame],
  [(Reboot Only) Eternal Rebirth Flame]
 - Hard Mode only Rewards: ,
 [Japanese Armor],
  [Lv. 130 Rebirth Flame]
-
 Normal Pink Bean
[ > 5k Main Stat] Earlygame Bosses:
-
 Easy Cygnus
 - Hard Hilla
-
 Easy/Normal Arkarium
 - Source of Reward Points, [Soul Shard], [Occult Cube], [Elixir], [(Normal Only) Power Elixir], [Crusader Coin], and [Intense Power Crystal]
- Easy mode and Above Rewards:
 [Mechanator Pendant], [Lv. 130 Rebirth Flame] ,
  [Primal Essence]
 - Normal mode only Rewards:
 [Dominator Pendant],
  [Arkarium Statue]
 - Ability to clear Arkarium early game will depend on your class, for example, does your class have a bind or iFrame?
- Source of
[ > 8k Main Stat] Earlygame Bosses:
[ > 12k Main Stat] Midgame Bosses:
[ > 14k Main Stat] Midgame Bosses:
Recommended to have at least >%90 IED and >200% Boss Damage for bosses beyond this point
- Chaos Root Abyss:
- Hard Magnus
- Source of Reward Points, [Soul Shard], [Occult Cube],
 [Power Elixir], [Crusader Coin], and [Intense Power Crystal]
 - Hard Mode only Rewards:
 [Superior Tyrant Cape],
  [Superior Nova Boots],
  [Cursed Kaiserium],
  [Lv. 150 Rebirth Flame] ,
  [Magnus Coin] ,
  [Magnus Horn Throne]
- Source of
-
 Akechi Mitsuhide:
- Source of Reward Points, [Occult Cube],
 [(Non-Reboot Only) Bonus Occult Cube], [Power Elixir], [Crusader Coin], and [Intense Power Crystal]
 - Main Rewards:

 [Japanese Wolf Weapons],
  [Mark of the Silver Wolf],
  [Sparkling Blue Star Potion],
  [Sparkling Red Star Potion],
  [Small EXP Accumulation Potion],
  [50% EXP Coupon Voucher], [Powerful Rebirth Flame], [Occult Cube], [Power Elixir], [Intense Power Crystal], [(Non-Reboot Only) Bonus Occult Cube]
 - Coin is usage to exchange for Japanese Wolf Weapons from Kobayakawa Takakage
- Source of
[ > 20k Main Stat] Midgame Bosses:
- Chaos Papulatus
-
 Normal Lotus
 - Source of Reward Points, [Soul Shard], [Occult Cube], [Power Elixir], [Crusader Coin], and [Intense Power Crystal]
- Normal Mode and Above Rewards:
 [Extraordinary Energy Core (Grade S)] , [Sparkling Blue Star Potion], [Sparkling Red Star Potion], [Small EXP Accumulation Potion], [Powerful Rebirth Flame], [50% EXP Coupon Voucher], [Power Elixir] , [Lv. 150 Rebirth Flame] , [Soul Shard] , [Occult Cube] , [Intense Power Crystal] , [Crusader Coins] , [(Non-Reboot Only) Bonus Occult Cube]
- Source of
-
 Normal Damien
 - Source of Reward Points, [Soul Shard], [Occult Cube], [Power Elixir] and [Intense Power Crystal]
- Normal Mode Rewards: ,
 [(Demon-Class Exclusive) Ruin Force Shield],
  [Twisted Stigma Spirit Stone] , [Sparkling Blue Star Potion], [Sparkling Red Star Potion], [Small EXP Accumulation Potion], [Powerful Rebirth Flame], [50% EXP Coupon Voucher], [Power Elixir] , [Lv. 150 Rebirth Flame] , [Soul Shard] , [Occult Cube] , [(Non-Reboot Only) Bonus Occult Cube], [Intense Power Crystal] , [Crusader Coins]
- Source of
- Hell Gollux (Hellux)
[ > 28k Main Stat] Midgame Bosses:
-
 Easy Lucid
 - Source of Reward Points, [Soul Shard], [Occult Cube], [(Non-Reboot Only) Bonus Occult Cube], [Power Elixir], [Crusader Coin], and [Intense Power Crystal]
- Easy Mode and Above Rewards: [Sparkling Blue Star Potion], [Sparkling Red Star Potion], [Small EXP Accumulation Potion], [Lv. 150 Rebirth Flame] , [Powerful Rebirth Flame], [Eternal Rebirth Flame], [50% EXP Coupon Voucher], [Soul Shard]
- Source of
-
 Easy Will
 - Source of Reward Points, [Soul Shard], [Occult Cube], [(Non-Reboot Only) Bonus Occult Cube], [Power Elixir], [Crusader Coin], and [Intense Power Crystal]
- Easy Mode and Above Rewards: [Sparkling Blue Star Potion], [Sparkling Red Star Potion], [Small EXP Accumulation Potion], [Lv. 150 Rebirth Flame] , [Powerful Rebirth Flame], [Eternal Rebirth Flame], [50% EXP Coupon Voucher], [Intense Power Crystal]
- Source of
-
 Normal Guardian Angel Slime
 - Source of Reward Points, [(Non-Reboot Only) Bonus Occult Cube], [Power Elixir], [Crusader Coin], and [Intense Power Crystal]
- Normal Mode and Above Rewards:
 [Guardian Angel Ring], [Sparkling Blue Star Potion], [Sparkling Red Star Potion], [Small EXP Accumulation Potion], [Rebirth Flame Lv. 150], [Powerful Rebirth Flame], [Eternal Rebirth Flame], [50% EXP Coupon Voucher], [Intense Power Crystal]
- Source of
Tier I Endgame Bosses:
Bosses beyond this point are not meant to be soloable and are more party-oriented bosses. As well, beyond this point, bosses will be separated by tiers as there is no good recommended stat indicators for the reasons mentioned earlier.
- Normal Lucid
- Normal Will
-
 Normal Gloom
 - Source of Reward Points, [Occult Cube], [(Non-Reboot Only) Bonus Occult Cube], [Power Elixir], [Crusader Coin], and [Intense Power Crystal]
- Normal Mode and Above Rewards:
 [Estella Earrings],
  [Spark of Determination], [Sparkling Blue Star Potion], [Sparkling Red Star Potion], [Small EXP Accumulation Potion], [Lv. 150 Rebirth Flame] , [Powerful Rebirth Flame], [Eternal Rebirth Flame],
  [Black Rebirth Flame], [50% EXP Coupon Voucher]
- Source of
-
 Normal Darknell
 - Source of Reward Points, [Soul Shard], [Occult Cube], [(Non-Reboot Only) Bonus Occult Cube], [Power Elixir], [Crusader Coin], and [Intense Power Crystal]
- Normal Mode and Above Rewards: [Estella Earrings], [Spark of Determination] , [Sparkling Blue Star Potion], [Sparkling Red Star Potion], [Small EXP Accumulation Potion], [Power Elixir] , [Lv. 150 Rebirth Flame] , [Powerful Rebirth Flame], [Eternal Rebirth Flame], [Black Rebirth Flame], [50% EXP Coupon Voucher], [Soul Shard] , [Intense Power Crystal] , [Crusader Coins] , [(Non-Reboot Only) Bonus Occult Cube]
- Source of
Tier II Endgame Bosses:
- Hard Lotus
- Source of Reward Points, [Soul Shard], [Occult Cube], [(Non-Reboot Only) Bonus Occult Cube], [Power Elixir], [Crusader Coin], and [Intense Power Crystal]
- Hard Mode Only Rewards:
 [AbsoLab Armor/Weapon Box],
  [Damaged Black Heart],
  [Lotusroid Android],
  [Beserked Face Accessory],
  [Orchid's Plush Bunny], [Black Rebirth Flame], [Eternal Rebirth Flame],
  [(Non-Reboot Only) Incredible Chaos Scroll of Goodness 60%],
  [(Non-Reboot Only) Scroll - Accessory Coupon],
  [(Non-Reboot Only) Unrelenting Flame],
  [(Non-Reboot Only) Forever Unrelenting Flame],
  [(Non-Reboot Only) Forever Unrelenting Black Flame]
- Source of
- Hard Damien
- Source of Reward Points, [Soul Shard], [Occult Cube], [(Non-Reboot Only) Bonus Occult Cube], [Power Elixir], [Crusader Coin], and [Intense Power Crystal]
- Hard Mode Only Rewards:
 [Damienroid Android],
  [Magic Eyepatch], [AbsoLab Armor/Weapon Box],
  [Damien's Sword], [Black Rebirth Flame], [Eternal Rebirth Flame], [(Non-Reboot Only) Incredible Chaos Scroll of Goodness 60%], [(Non-Reboot Only) Scroll - Accessory Coupon], [(Non-Reboot Only) Unrelenting Flame], [(Non-Reboot Only) Forever Unrelenting Flame], [(Non-Reboot Only) Forever Unrelenting Black Flame]
- Source of
- Hard Lucid
- Source of Reward Points, [Soul Shard], [Occult Cube], [(Non-Reboot Only) Bonus Occult Cube], [Power Elixir], [Crusader Coin], and [Intense Power Crystal]
- Hard Mode Only Rewards:
 [Lucidroid],
  [Dreamy Belt],
  [Arcane Umbra Armor/Weapon Box], [Black Rebirth Flame],
  [Lucid's Canopy Bed], [(Non-Reboot Only) Incredible Chaos Scroll of Goodness 60%], [(Non-Reboot Only) Scroll - Accessory Coupon], [(Non-Reboot Only) Unrelenting Flame], [(Non-Reboot Only) Forever Unrelenting Flame], [(Non-Reboot Only) Forever Unrelenting Black Flame]
- Source of
- Hard Will
- Source of Reward Points, [Soul Shard], [Occult Cube], [(Non-Reboot Only) Bonus Occult Cube], [Power Elixir], [Crusader Coin], and [Intense Power Crystal]
- Hard Mode Only Rewards:
 [Will's Cursed Spellbook Selection Box], [Arcane Umbra Armor/Weapon Box],
  [Mirror World Nodestone], [Black Rebirth Flame],
  [Will's Web Swing Chair], [(Non-Reboot Only) Incredible Chaos Scroll of Goodness 60%], [(Non-Reboot Only) Scroll - Accessory Coupon], [(Non-Reboot Only) Unrelenting Flame], [(Non-Reboot Only) Forever Unrelenting Flame], [(Non-Reboot Only) Forever Unrelenting Black Flame]
- Source of
-
 Normal Verus Hilla
 - Source of Reward Points, [Soul Shard], [Occult Cube], [(Non-Reboot Only) Bonus Occult Cube], [Power Elixir], [Crusader Coin], and [Intense Power Crystal]
- Normal Mode and Above Rewards:
 [Daybreak Pendant], [Arcane Umbra Armor/Weapon Box], [Sparkling Blue Star Potion], [Sparkling Red Star Potion], [Small EXP Accumulation Potion], [Lv. 150 Rebirth Flame] , [Powerful Rebirth Flame], [Eternal Rebirth Flame], [Black Rebirth Flame], [50% EXP Coupon Voucher],
  [(Non-Reboot Only) Incredible Chaos Scroll of Goodness 60%]
- Source of
Tier III Endgame Bosses:
- Chaos Gloom
- Source of Reward Points, [Occult Cube], [(Non-Reboot Only) Bonus Occult Cube], [Power Elixir] and [Intense Power Crystal]
- Chaos Mode Only Rewards:
 [Endless Terror],
  [Gloom Dark Bean Bag],
  [Primal Essence], [(Non-Reboot Only) Incredible Chaos Scroll of Goodness 60%], [(Non-Reboot Only) Premium Scroll - Accessory Coupon],
  [(Non-Reboot Only) Premium Scroll - Pet Equipment Coupon],
  [(Non-Reboot Only) Magical Scroll - Weapon Coupon], [(Non-Reboot Only) Unrelenting Flame], [(Non-Reboot Only) Forever Unrelenting Flame], [(Non-Reboot Only) Forever Unrelenting Black Flame]
- Source of
- Hard Verus Hilla
- Source of Reward Points, [Soul Shard], [Occult Cube], [(Non-Reboot Only) Bonus Occult Cube], [Power Elixir], [Crusader Coin], and [Intense Power Crystal]
- Hard Mode Only Rewards:
 [Source of Suffering],
  [Shadow of Annihilation],
  [Soul Candle], [Primal Essence], [(Non-Reboot Only) Premium Scroll - Accessory Coupon], [(Non-Reboot Only) Premium Scroll - Pet Equipment Coupon], [(Non-Reboot Only) Magical Scroll - Weapon Coupon], [(Non-Reboot Only) Unrelenting Flame], [(Non-Reboot Only) Forever Unrelenting Flame], [(Non-Reboot Only) Forever Unrelenting Black Flame]
- Source of
- Hard Darknell
- Source of Reward Points, [Soul Shard], [Occult Cube], [(Non-Reboot Only) Bonus Occult Cube], [Power Elixir], [Crusader Coin], and [Intense Power Crystal]
- Hard Mode Only Rewards:
 [Commanding Force Earrings], [Arcane Umbra Armor/Weapon Box],
  [Darknell's Helmet Decoration], [Primal Essence], [(Non-Reboot Only) Premium Scroll - Accessory Coupon], [(Non-Reboot Only) Premium Scroll - Pet Equipment Coupon], [(Non-Reboot Only) Magical Scroll - Weapon Coupon], [(Non-Reboot Only) Incredible Chaos Scroll of Goodness 60%], [(Non-Reboot Only) Unrelenting Flame], [(Non-Reboot Only) Forever Unrelenting Flame], [(Non-Reboot Only) Forever Unrelenting Black Flame]
- Source of
- Chaos Guardian Angel Slime
- Source of Reward Points, [(Non-Reboot Only) Bonus Occult Cube], [Power Elixir], [Crusader Coin], and [Intense Power Crystal]
- Main Rewards: [Guardian Angel Ring], [Black Rebirth Flame], [Primal Essence], [Sparkling Blue Star Potion], [Sparkling Red Star Potion], [Small EXP Accumulation Potion], [Rebirth Flame Lv. 150], [50% EXP Coupon Voucher], [Powerful Rebirth Flame], [Eternal Rebirth Flame]
- Source of
Tier IV Endgame Bosses:
- Black Mage
- Source of Reward Points, [Occult Cube], [(Non-Reboot Only) Bonus Occult Cube], [Power Elixir], [Crusader Coin], and [Intense Power Crystal]
- Main Rewards:
 [Sealed Genesis Weapon Box],
  [Genesis Badge], [Arcane Umbra Armor/Weapon Box],
  [Black Mage's Mirror], [Primal Essence], [Sparkling Blue Star Potion], [Sparkling Red Star Potion], [Small EXP Accumulation Potion], [Lv. 150 Rebirth Flame] , [Powerful Rebirth Flame], [Eternal Rebirth Flame], [Black Rebirth Flame], [50% EXP Coupon Voucher], [(Non-Reboot Only) Premium Scroll - Accessory Coupon], [(Non-Reboot Only) Premium Scroll - Pet Equipment Coupon], [(Non-Reboot Only) Magical Scroll - Weapon Coupon], [(Non-Reboot Only) Incredible Chaos Scroll of Goodness 60%], [(Non-Reboot Only) Unrelenting Flame], [(Non-Reboot Only) Forever Unrelenting Flame], [(Non-Reboot Only) Forever Unrelenting Black Flame]
- Source of
-
 Seren
Seren - Source of Reward Points, [Occult Cube], [(Non-Reboot Only) Bonus Occult Cube], [Power Elixir], [Crusader Coin], and [Intense Power Crystal]
- Main Rewards:
 [Mitra's Rage Selection Box],
  [Mitra's Nodestone], [Daybreak Pendant], [Primal Essence], [Sparkling Blue Star Potion], [Sparkling Red Star Potion], [Small EXP Accumulation Potion], [Lv. 150 Rebirth Flame] , [Powerful Rebirth Flame], [Eternal Rebirth Flame], [Black Rebirth Flame], [50% EXP Coupon Voucher], [(Non-Reboot Only) Premium Scroll - Accessory Coupon], [(Non-Reboot Only) Premium Scroll - Pet Equipment Coupon], [(Non-Reboot Only) Magical Scroll - Weapon Coupon], [(Non-Reboot Only) Incredible Chaos Scroll of Goodness 60%], [(Non-Reboot Only) Unrelenting Flame], [(Non-Reboot Only) Forever Unrelenting Flame], [(Non-Reboot Only) Forever Unrelenting Black Flame]
- Source of
-
 Kalos
Kalos - Source of Reward Points, [Soul Shard], [Occult Cube], [(Non-Reboot Only) Bonus Occult Cube], [Power Elixir], [Crusader Coin], and [Intense Power Crystal]
- Main Rewards:
 [Kalos's Residual Determination],
  [Kalos Ceiling Fan], [Primal Essence], [Sparkling Blue Star Potion], [Sparkling Red Star Potion], [Small EXP Accumulation Potion], [Lv. 150 Rebirth Flame] , [Powerful Rebirth Flame], [Eternal Rebirth Flame], [Black Rebirth Flame], [50% EXP Coupon Voucher], [(Non-Reboot Only) Premium Scroll - Accessory Coupon], [(Non-Reboot Only) Premium Scroll - Pet Equipment Coupon], [(Non-Reboot Only) Magical Scroll - Weapon Coupon], [(Non-Reboot Only) Incredible Chaos Scroll of Goodness 60%], [(Non-Reboot Only) Unrelenting Flame], [(Non-Reboot Only) Forever Unrelenting Flame], [(Non-Reboot Only) Forever Unrelenting Black Flame]
 - [Kalos's Residual Determination] is used to redeem


 [Eternal Gear]
- Source of
Daily / Weekly Quests:
A majority of Daily and Weekly Quests are mostly done at Lv. 200+. Characters pre-200 do not need to worry about these quests as much
Optional:
Training Maps:
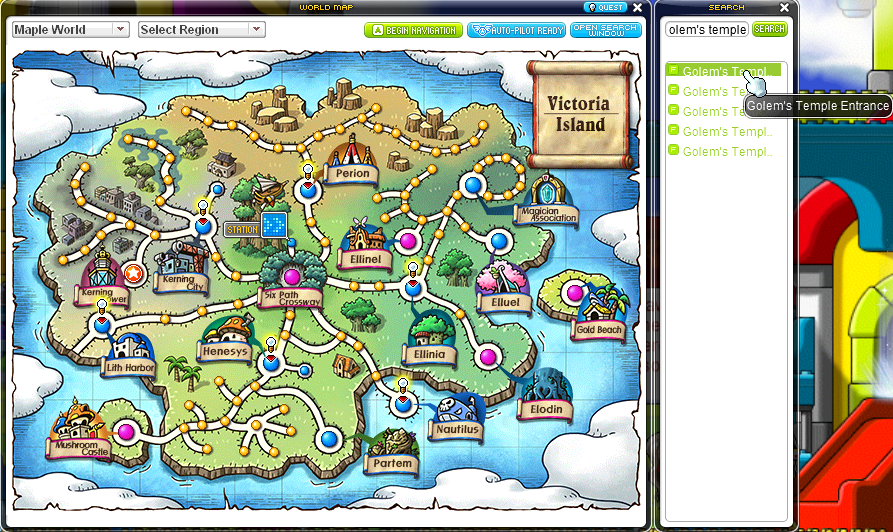
Below is a list of recommended training maps for grinding. To find out how to navigate to a specific map, open your World Map (W by default) and search for the desired map on the right-hand side. Clicking on the item you want will direct you to the map which will start blinking
Special thanks to Proof#8868 for the recommended training maps. Click here for a Google Sheets version of the training maps
*Search function may not be 100% reliable
Theme Dungeons:
Quests:
Lightbulb Quests:
The quests found in your "Maple Mailbox" or the Lightbulb icon on the left-hand side may be overwhelming with the number of quests available. Here will be a list of quests and which ones are more important compared to others. If you do not see a certain quest, it may be tied to your class' storyline. These can be skipped by most classes. But, Explorer classes, Hoyoung, and Adele gain special rewards though from their class' storyline so, it should not be skipped. Quests with the label [Required] should also be completed
Recommended Quests:
Theme Dungeon Starting Quests:
Quests labeled in orange are recommended, in green are optional, in white are skippable
The Lv. 30 Theme Dungeons are recommended as completing 2 and a half theme dungeons is enough to reach Lv. 60 to complete your 3rd Job Advancement. Theme Dungeons between Lv. 60 - 120 are completely optional (except for Lion King's Castle) as grinding is much faster and less tedious at these levels. They can be done if you dislike grinding but you will not gain as many levels compared to Lv. 30 - 60
Optional Quests:
- (Lv. 10) Do you know about Maple Guide? - Tutorial quest explaining Maple Guide
- (Lv. 20) Do you know about Spell Enhancements? - Tutorial quest explaining Spell Tracing
- (Lv. 20) Do you know about Star Force Enhancements? Tutorial quest explaining Star Forcing
- (Regular Server only) (Lv. 33) Mysterious Merchant Matilda - Tutorial quest explaining Matilda, an NPC that sells
 [AP Reset Scrolls],
  [SP Reset Scrolls],
  [Buff Freezers],
  [Safety Charms], and
  [Respawn Tokens] for Mesos
 - (Lv. 33) Trainer's Command - A special quest for unlocking the ability to have 3 pets out at once. Requires you to obtain a
 [Pet Snack] from the Cash Shop using NX or Reward Points
 - (Lv. 50) [Boss Matchmaking] Fight Together! - Tutorial quest explaining the Boss Matchmaking system
- (Lv. 50) [Zakum] Statue of Dread - Quest that explains Zakum and teleports you to El Nath - Chief's Residence
- This is a one-time teleport, you can use it to get to Zakum quickly at Lv. 100 to fight it
- This quest is not required to fight Zakum
- Talking to your corresponding Job NPC (Warrior, Mage, Thief, etc.) will teleport you directly to the entrance of Zakum, this can be used an unlimited number of times
- (Lv. 60) Have you learned about Potential? - Tutorial quest explaining equipment potentials
- Main Reward:
 [Curbrock's Shoulder Accessory]
- Main Reward:
- (Lv. 60) Have you learned about Bonus Stats? - Tutorial quest explaining equipment bonus stats
- Main Reward:
 [Curbrock's Ring]
- Main Reward:
- (Lv. 80) Use the Transfer Hammer! - Tutorial quest explaining Transfer Hammer
- (Lv. 100) [Grand Athenaeum] Visit the Grand Athenaeum - Cutscene heavy storyline that explains Maple World lore
- Main Rewards:
 [Scholarly Pendant] for completing 3 stories
- Main Rewards:
- (Lv. 140) [Dimension Invasion] Across Worlds - A quest to get started with Dimension Invasion. Provides a quick explanation of Dimension Invasion
- (Lv. 140) [Tower of Oz] Tower Under the Sea - A quest to get started with the Tower of Oz. Provides a quick explanation and tutorial for Tower of Oz
- (Lv. 140) [System] Item Update - Provides an explanation to Transposing after reaching San Commerci
- (Lv. 145) [Shaolin Temple] Elder Jung's Summons - Storyline
- (Lv. 160) [Showa Town] Welcome to Shawa Town! - Starts storyline for Showa Town which is required to unlock access to the boss Yakuza Boss
- (Lv. 170) [NLC] Welcome back to NLC! - Starts storyline for New Leaf City
- (Lv. 170) [Kritias] Sudden Kingdom - Completing this storyline unlocks access to Invasions and Daily Quests within Kritias to gain
 [Kritias Commemorative Coins] to use in a special shop. You can travel to Kritias from Leafre
 - (Lv. 180) [Phantom Forest] The Corrupted Forest - Completing the storyline for this area unlocks access to Daily Quests that reward
 [Raven Ninja Coins] and
  [Shadowknight Coins] to buy items from Mo and Fiona in the Phantom Forest
 - (Lv. 200) [Battle Content] Alien Visitors - A quest to get started with Alien Visitors PQ. Provides a quick explanation to Alien Visitor
Can Be Skipped:
[Note]: Quests above Lv. 140 can be done as they provide some equipment but are rarely done compared to the quests in Optional
hendersonmingly47.blogspot.com
Source: https://www.grandislibrary.com/content/progression-guide
0 Response to "Continue the Pursuit Korean Folk Town Quest Maplestory"
Postar um comentário